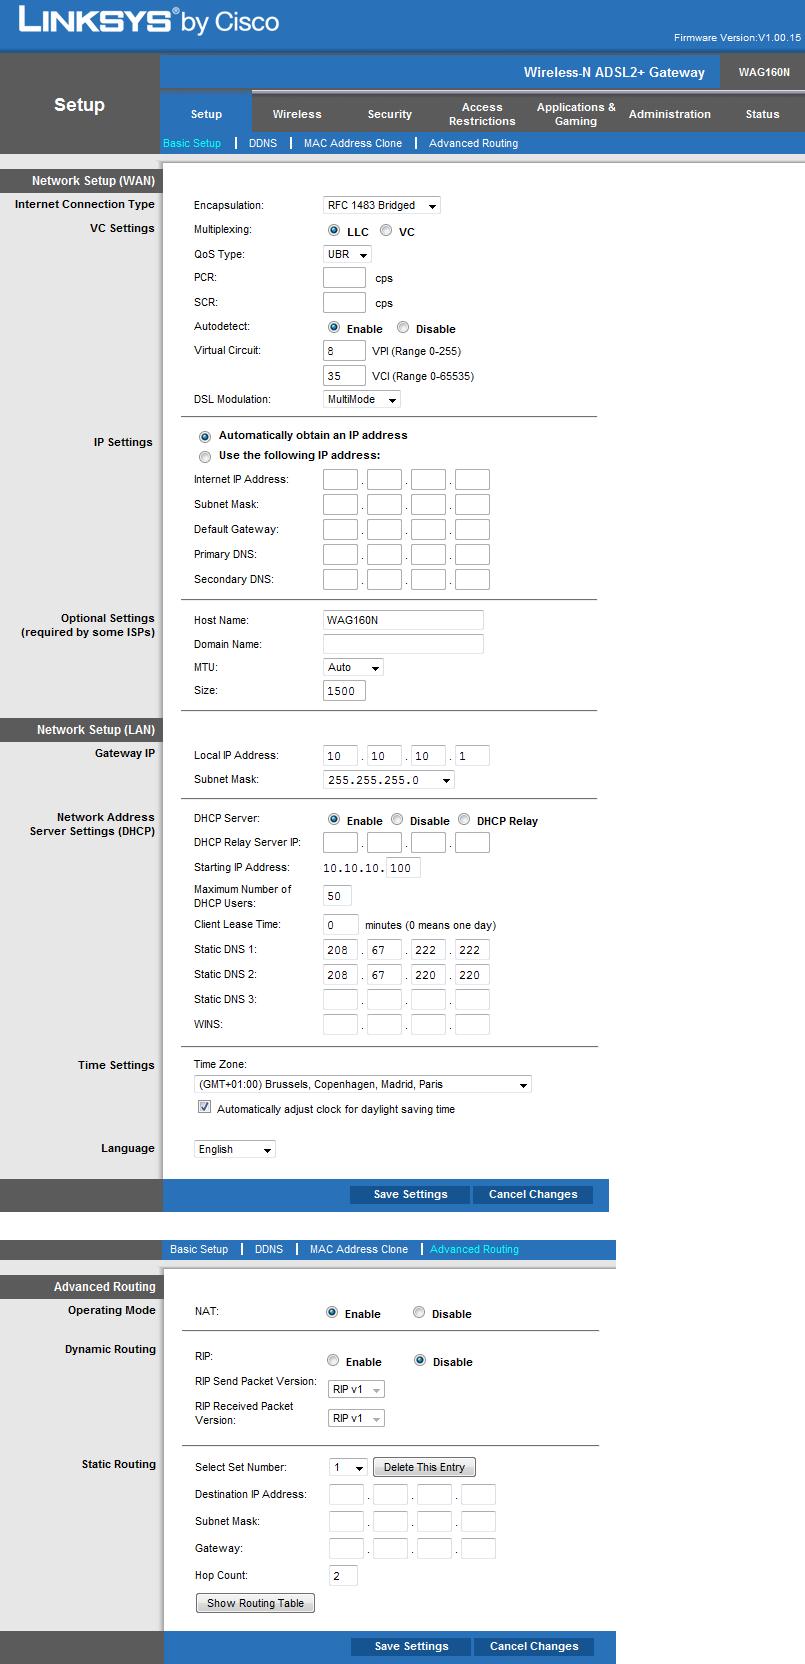
Linksys WAG160N/WAG120N RFC 2684 (before 1483) multi-protocol over ATM, config Dommel CityConnect (Wan DHCP, ADSL2+)
Because this is the 3th time someone asked me for the Linksys settings for the Belgian provider Dommel. I just post them here:
MS RDP Performance / Bandwidth Usage
After some experimenting with Terminal Services in Server 2008 R2, I wondered what kind of bandwidth the RDP protocol needs to guarantee a smooth workflow. After some googling I found a Case Study by Microsoft showing the used bandwidth for every configurable option, below the conclusion the summary.
Short Conclusion
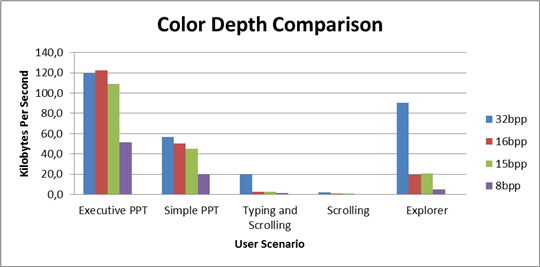
Average bandwidth used with the Performance optimized for modem settings
(no Themes, no ClearType and no Desktop Composition):
- High Color 8 bit: 18.45 Â KB/s
- High Color 15 bit: 39.45 KB/s (+21)
- High Color 16 bit: 44.2 Â KB/s (+4.75)
- High Color 32 bit: 49.65 KB/s (+5.45)
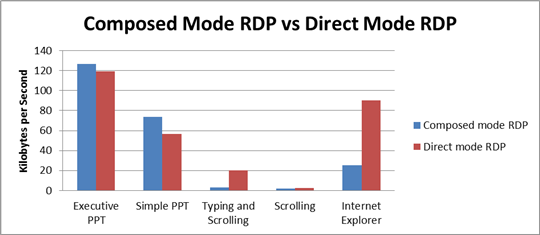
For Regular users Composed Mode seems to be an advantage, for the Typing and Scrolling users, it’s 6.6  times faster than the direct mode.
So for your next RDP session I suggest:
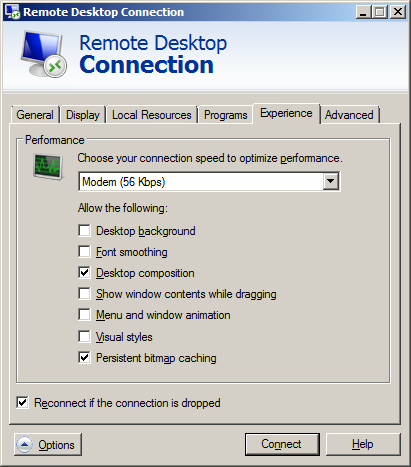
- Select the Modem (56 Kpbs ) preferences
- Enable Desktop Composition
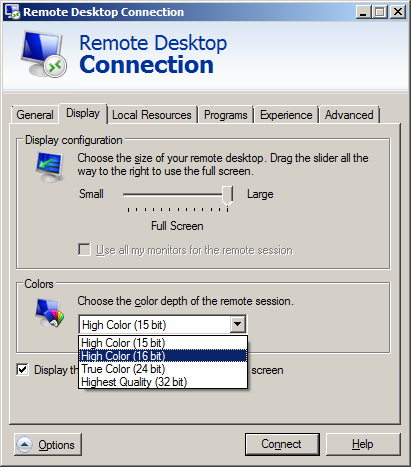
- High Color 15bit
Test Scenario
- Connection speed setting: Modem (56 kilobits per second [Kbps])
- Default bulk compression settings, unless others are mentioned
- Private lab network
- Web sites stored on servers HDD
User Scenarios
Five different user scenarios were used to measure the performance of the Remote Desktop Connection (RDC) client.
- Executive PPT Scenario. This scenario emulates a user presenting 28 high-fidelity slides by using PowerPoint 2007. The slides contain images, transitions, and backgrounds with color gradient. The user spends about 20 seconds on each slide.
- Simple PPT Scenario. This scenario emulates a user creating and presenting content by using PowerPoint 2007. The slides in this scenario are more text-intensive than those in the executive PowerPoint scenario and have a plain background. Some of the slides contain digital photo images.
- Typing and Scrolling Scenario. This scenario emulates a user scrolling through a 10-page document and typing 8 pages in another document by using Microsoft Office Word 2007. The user types at 35 words per minute and scrolls at about 2 pages per minute. The user also moves and resizes the windows as he moves between the two documents.
- Scrolling Scenario. This scenario emulates a user scrolling through a 275-page Word 2007 document that contains several Visio 2007 (data-flow) diagrams and embedded tables. The user scrolls at about 2 pages per minute.
- Internet Explorer Scenario. This scenario emulates a user browsing the Web by using Internet Explorer 7. The user browses and scrolls through multiple Web pages that contain a mix of text, natural images, and some schematic diagrams. The Web pages are stored on the local disk drive of the terminal server to avoid errors due to varying load times.
Color Depth Comparison
Experience Options comparison
Option 2: ClearType Virtualization (Font Smoothing)
With ClearType enabled, fonts are transmitted as bitmaps and not as glyphs.
Option 3: Desktop Composition
When Desktop Composition is enabled, individual windows no longer draw directly to the screen or primary display device as they did in earlier versions of Windows. Instead, their drawing is redirected to off-screen surfaces in video memory, which are then rendered into a desktop image and presented on the display
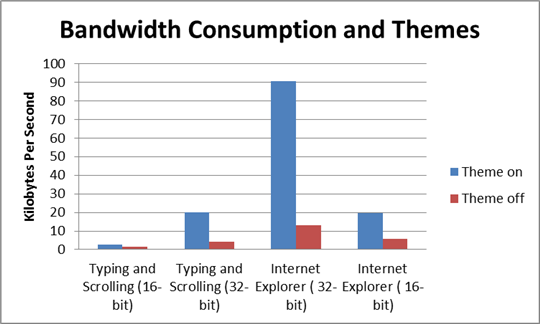
Option 4,5,6: Desktop Themes
(Themes can be enabled on Windows Server 2008 by installing the Desktop Experience feature and enabling the theme service)
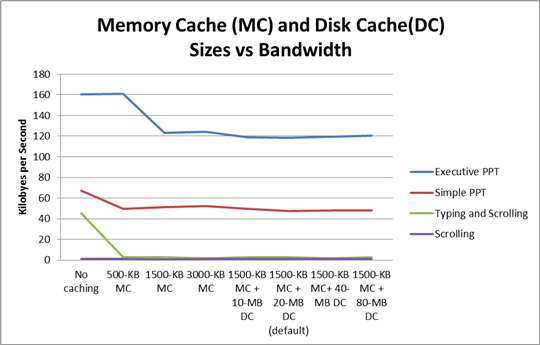
Option 7: Bitmap Caching
The Remote Desktop Connection client supports both memory-based and persistent disk caches. Memory-based and persistent disk caches save the bitmaps from the server to the client computer in memory or on the disk; this allows cached bitmaps to be reused between client sessions and provides a much larger cache size. Caching saves about 25% bandwidth for most of our user scenarios
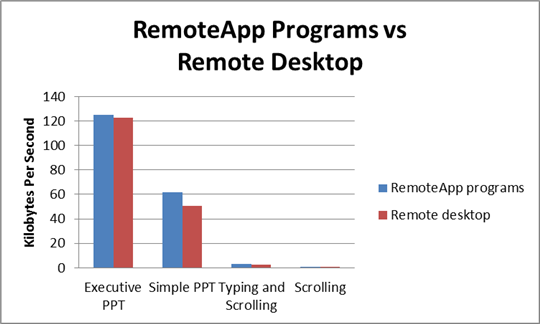
RemoteApp Programs
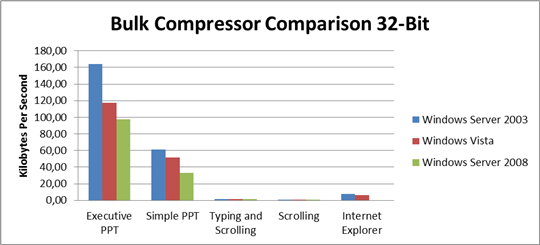
Compression comparison Server 2003 / Vista / Server 2008
Installing Exchange 2010 on Windows Server 2008 R2 DC

A time ago I installed a Exchange 2010 server on Windows server 2008 R2 x64 for a friend of mine that couldn't get his Mac (buit-in Mail program) with Snow Leopard working with Exchange 2003.
First some technical data:
Exchange version (Get-ExchangeServer | fl name,edition,admindisplayversion): 14.0 Build 639.21
After installing and forwarding the http/https ports, there were no problems for the mac, after a while I was also preparing to switch my account to 2010 on all computers, then the problems began.
On the Exchange 2003 server I used ISA server 2007, where you just select the RPC protocol to be allowed and ISA does the rest. (Client PCs connect on 135, and then the server assigns the client a private port in the 49152-65535 range, wich the ISA firewall will open automatically if needed)
The new Exchange 2010 server is behind an transparent Linux firewall (using Shorewall), and the RPC range is too big to just open all the RPC ports. I thought, limiting the RPC range is an option, but RPC over HTTPS is a much safer way and because the Belgium internet provider Telenet blocks all outgoing traffic on port 135, from clients to the internet (since the blast virus centuries ago!), RPC over HTTPS had to be configured anyway.
Some errors I ran into:
- Error Message: This Security Certificate Was Issued by a Company that You Have Not Chosen to Trust (http://support.microsoft.com/kb/297681)
- Indefinitely loop of asking for logon credentials (login and password) when opening outlook, username and password were correct of course, but they weren't accepted(I found out this was because the authentication type wasn't the same for IIS, the client and Outlook Anywhere)(on the bottom there is a link with other causes and solutions)
- After using outlook for a while (2-3minutes) (configured to connect without SSL), it prompts 3 certificate errors
Steps that worked for me:
Because windows seems to have a seriously strict certificate policy I also just installed the certificate services on the server.
Step 1 Installing Windows Server 2008 R2 x64 and Exchange 2010
- Install Windows Server 2008 R2 x64 (Configure your static IP and computername)
- Run DCPROMO
- Install Roles
- Active Directory Certificate Services
- Certification Authority
- Certification Authority Web Enrollment
- Web Server IIS
- Security: Basic Authentication
- Security: Windows Authentication
- Performance: Static Content Compression
- IIS 6 Management Compatibility: IIS6 Metabase Compatibility
- Active Directory Certificate Services
- Install Features
- RPC over HTTP Proxy
- Install 2007 Office System Converter: Microsoft Filter Pack
- Set startup mode of "Net.Tcp Port Sharing Service" to Automatic: Using the powershell: Set-Service NetTcpPortSharing -StartupType Automatic
- Install Updates (to be sure) and reboot
- Install Exchange 2010
Step 2 Installing Certificate
- Follow this tutorial to install the certificate signed by your own CAhttp://gretech.be/blog/index.php/2010/04/24/installing-exchange-certificate-using-ad-certificate-services-gui-on-exchange-2010/
Step 3 Enable Outlook Anywhere (RPC over HTTP)
- Open Exchange Management Console
- Server Configuration > Client Access > Right click your server > Enable Outlook Anywhere
- Fill in the External host name, check NTLM, complete the wizard(I chose to use NTLM, because with NTLM it is possible to remember your password in windows, so you aren't always asked to enter credentials when opening outlook. check later steps to configure that on your client windows PC)
- Reboot
- Check that it is activated: Event viewer > Richt click Application log > Filter > Event ID: 3006, normally there is a log that says it is enabled;
- HOSTS file edit, Normally this action is only needed if the exchange server is a Domain member, and is not required if the Exchange server and DC are the same. But just to be sure I did it anyway:
- Open C:\Windows\system32\drivers\etc\hosts file
- comment #::1 if needed
- add something like this: (gretechmail is the computername):::1 localhost91.196.171.202 gretechmail
91.196.171.202 gretechmail.adn.gretech.be
Enable Outlook Anywhere Video tutorial (Only step 1 needed)
Default settings for Exchange-related virtual directories in Exchange Server 2007
Step 4 Autodiscover
- Create the CNAME autodiscover.emaildomain.com (f.e. if your email domain is @gretech.be, create a domain autodiscover.gretech.be and point it to the mailserver, in our case: gretechmail.adn.gretech.be)or you can also use a SRV record if your DNS allows this
: http://support.microsoft.com/kb/940881
More autodiscover options and troubleshooting can be found here: http://www.exchange-genie.com/2007/07/exchange-2007-autodiscover-service-part-1/
Testing Autodiscovery: Test-OutlookWebServices -Identity Administrator | fl
Problem: First Autodiscover didn't work for me, after running the above command in the Exchange shell, I've got the following error:
When contacting https://gretechmail.adn.gretech.be/Autodiscover/Autodiscover.xml received the error The remote server returned an error: (500) Internal Server Error.
The solution that worked for me was:
Remove-AutodiscoverVirtualDirectory -Identity "gretechmail\Autodiscover (Default Web Site)"
New-AutodiscoverVirtualDirectory
Step 5 Configuring Exchange 2007 Hub Transport role to receive Internet mail (this applies only when installing all exchange services on 1 server, so no edge server)
http://msexchangeteam.com/archive/2006/11/17/431555.aspx
- Server Configuration > Hub Transport > Default Receive connector: Allow anonymous connections on the receive connector
- Organization Configuration > Hub Transport > Accepted domains: Accept your domains to enter the server
- Organization Configuration > Hub Transport > Create new Send Connector (to Internet, all domains) (http://www.petri.co.il/configuring-exchange-2007-send-external-email.htm)
- Enable Anti-spam (using the poweshell):cd "C:\Program Files\Microsoft\Exchange Server\V14\Scripts\"./install-AntispamAgents.ps1
restart-service msexchangetransport
- Disable the Microsoft Exchange EdgeSync service service
Step 6 Configure outlook and remember my password
- Install the CA certificate in IE with admin rights
(XP: use the created Rootinstall.asp page of step 2
Vista/7: Download, Open and install the CA-cert.cer file created in step 2 in the "Trusted Root certification authorities" folder) - Control Panel > View profiles > Add > Enter a profile name.
- Normally if autodiscover works, you can enter your name and email according to the AD data.
But, for testing purposes, screenshots of the manual procedure below.
- Control Panel > View profiles > Add > Enter a profile name.
- Manually configure server settings > Select Microsoft Exchange and click next
- Server: f.e gretechmail.adn.gretech.be (in our case)Username: f.e. Gregory BeankensClick more setting (ignore errors)
- On the Security tab
- Encryption > Check Encrypt data between Microsoft Outlook and Microsoft Exchange
- Logon network security > Negotiate Authentication
- On the Connection tab
- Check Connect to Miscrosoft Exchange using HTTP
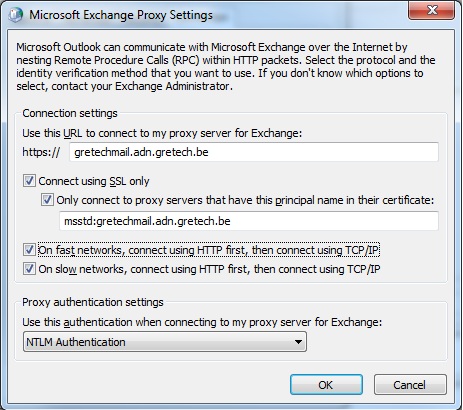
- Click Exchange Proxy Settings (check screenshot below)
- Click OK in all the windows and then Next to finish the wizard
How to remember my password:
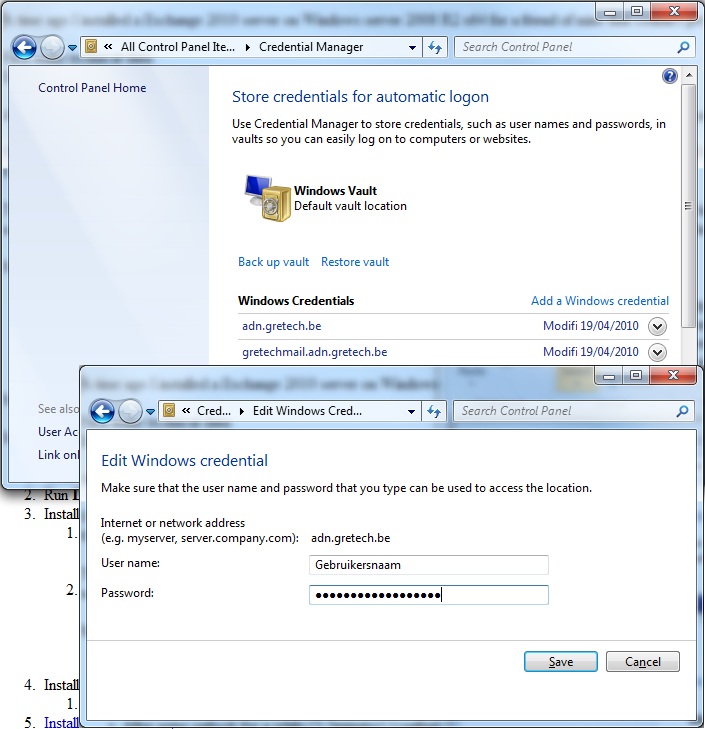
- Control panel > User accounts, if necessary click on your account name
- On the left, manage your credentials (manage your network passwords in vista) > Add
Domain: - The AD domain name (f.e. adn.gretech.be)Username: Username (f.e. Gregory Beankens)
(ADdomainName\Username in Windows XP and Vista)
Handy installation guide for 2007, looks like 2010 installation.
http://www.commodore.ca/windows/exchange/how_to_setup_exchange_2007_in_2hours.htm
Other solutions for the indefinitely loop of asking for logon credentials (login and password) when opening outlook.
Installing Exchange Certificate using AD Certificate Services (GUI) on Exchange 2010
Installing all the necessary Roles & Features
- Role: Active Directory Certificate Services
(Certification Authority & Certification Authority Web Enrollment)
(if asked for an expire date, put it on 2060 or so)
Summary:
First we create a certificate server for the domain, after that we export a certificate request from Exchange, we import it in the created Certificate Authority server using the web interface, then save the .cer file and import that one in Exchange again. After all that, do not forget to import the Certificate Authority certificate on the client pcs to avoid security warnings.
Step 1: Creating exchange certificate and exporting the request:
Follow this tutorial:
http://blogs.microsoft.co.il/blogs/eldadc/archive/2009/07/15/how-to-configure-exchange-2010-certificate.aspx
- On the Organization and Location page, save the .req file for e.g. C:\Exch_req.req.
When asked to send the request to a certificate authority, goto step 2. After step 2 continue the above tutorial.
Step 2: Submit Certificate request to your Certificate server
- In IE on your Certificate Server, surf to https://127.0.0.1/certsrv (first make sure 127.0.0.1 is a trusted website)
- Click Request a certificate
- Advanced certificate request
- Submit a certificate request by using a base-64-encoded CMC or PKCS #10 file, or submit a renewal request by using a base-64-encoded PKCS #7 file
- Open C:\Exch_req.req with notepad, and copy the thumbprint (the string between the start and end message)
- Paste this thumbprint in the Saved Request: field
- Change the Certificate Template to Web Server
- Click Submit
- Download the Base64 version, .cer and .p7b version, save them to C:\exch-sert.cer and C:\exch-sert.p7b
- Continue the tutorial from step 1.
Step 3: Get your CA certificate and create installation web page for clients (so clients accept all certificates from this CA)
- Again goto https://127.0.0.1/certsrv/
- Click Download a CA certificate, certificate chain, or CRL, and click Yes in the Web Access Confirmation dialog
- Select Base 64
- Click Download CA certificate and save it to C:\CA-cert.cer
- Create an edit C:\Inetpub\Wwwroot\Rootinstall.asp
- Open: http://support.microsoft.com/?scid=kb%3Ben-us%3B297681&x=6&y=7 and goto step 3, copy that text in the file.
- Replace
Set MyFile = fs.OpenTextFile("c:\certificates\base64.cer", 1)
by
Set MyFile = fs.OpenTextFile("C:\CA-cert.cer", 1) - Browse to the Rootinstall.asp file from a client browser. If your root certificate is not already in the store, you are prompted to install it.
Vista / Windows 7: The Rootinstall.asp page doesn't seem to work in Vista and 7, Clients have to install the certificate manual.
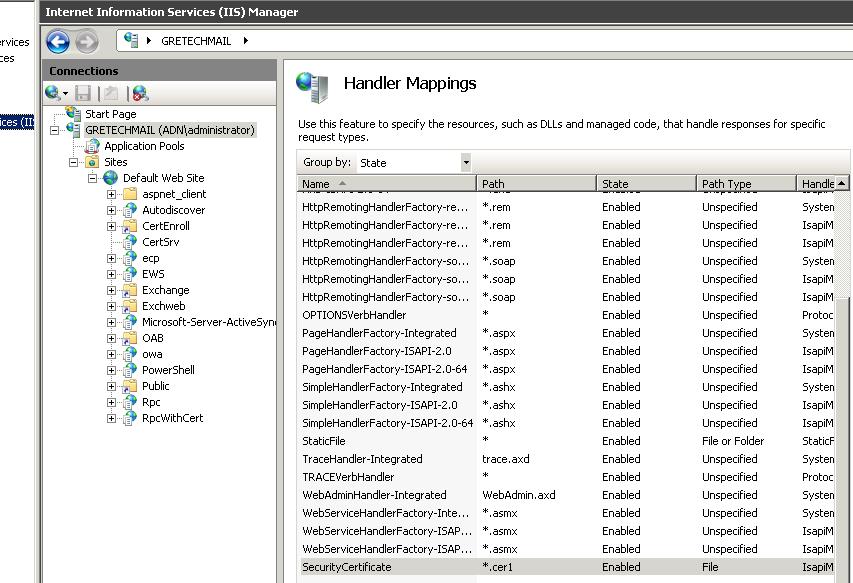
To allow clients to download the above created .cer file, open the Server Manager and open IIS7,
First add the mime type: (IIS > Mime Types, add extension: .cer, type: application/pkix-cert)
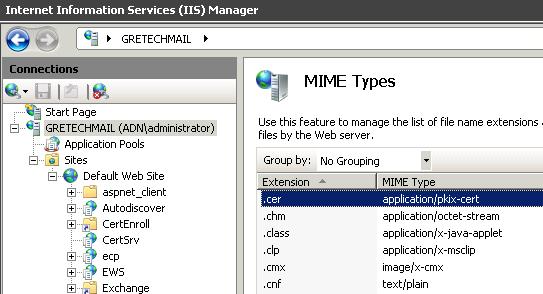 Second, rename the .cer mapping to .cer1 to allow the file to be downloaded by the clients.
Links
http://it.thelibrarie.com/weblog/?p=55
Cisco 877 (800 serie) RFC 2684 (before 1483) multi-protocol over ATM, config Dommel CityConnect (Wan DHCP, ADSL2+)
Config I use for the Belgium provider Dommel with the Cityconnect ADSL2+ they offer.
- WAN IP: DHCP (ATM0.1 point-to-point)
- LAN Router IP: 10.10.10.1
- DHCP Range: 10.10.10.10 10.10.10.240
- DNS Server forwarding requests to OpenDNS
- NTP Server forwarding requests to 81.246.92.140 and 212.68.213.7 (be.pool.ntp.org ip's)
- Timezone Paris
- Incoming ACL: 101
- Outgoing ACL: 100
- SSH via WAN on port 822
- SNMP Private string: privateString
- SNMP Public string: publiekeString
- Logging previous 300 console commands
!* cisco-axelius.axelius.be.CiscoConfig

!* IP Address : 10.10.10.1

!* Community  : privateString

!* Downloaded 21/03/2010 19:07:58 by SolarWinds Config Transfer Engine Version 5.5.0

!

! Last configuration change at 19:06:47 Paris Sun Mar 21 2010 by admin

! NVRAM config last updated at 19:06:53 Paris Sun Mar 21 2010 by admin

!

version 12.4

no service pad

service tcp-keepalives-in

service tcp-keepalives-out

service timestamps debug datetime msec localtime show-timezone

service timestamps log datetime msec localtime show-timezone

service password-encryption

service sequence-numbers

!

hostname cisco-axelius

!

boot-start-marker

boot-end-marker

!

logging buffered 51200 debugging

logging console critical

enable secret 5 ...

!

no aaa new-model

!

resource policy

!

clock timezone Paris 1

clock summer-time Paris date Mar 30 2003 2:00 Oct 26 2003 3:00

ip subnet-zero

ip cef

no ip dhcp use vrf connected

ip dhcp excluded-address 10.10.10.1 10.10.10.9

ip dhcp excluded-address 10.10.10.241 10.10.10.254

!

ip dhcp pool sdm-pool1

import all

network 10.10.10.0 255.255.255.0

default-router 10.10.10.1

dns-server 10.10.10.1

!

!

ip tcp synwait-time 10

no ip bootp server

ip domain name axelius.be

ip name-server 208.67.222.222

ip name-server 208.67.220.220

ip ssh time-out 60

ip ssh authentication-retries 5

!

!

crypto pki trustpoint TP-self-signed-4008809079

enrollment selfsigned

subject-name cn=IOS-Self-Signed-Certificate-4008809079

revocation-check none

rsakeypair TP-self-signed-4008809079

!

!

crypto pki certificate chain TP-self-signed-4008809079

certificate self-signed 01

30820250 ...

quit

username admin privilege 15 secret 5

archive

log config

logging enable

logging size 300

hidekeys

!

!

!

bridge irb

!

!

interface ATM0

description Fysieke ADSL (ATM) Interface

no ip address

no atm ilmi-keepalive

dsl operating-mode auto

!

interface ATM0.1 point-to-point

description ATM Routed Bridge Encapsulation (RBE) Subinterface t.b.v. Internet

ip address dhcp

ip access-group 101 in

ip nat outside

ip virtual-reassembly

no snmp trap link-status

atm route-bridged ip

pvc 8/35

encapsulation aal5snap

protocol ip inarp

!

!

interface FastEthernet0

!

interface FastEthernet1

!

interface FastEthernet2

!

interface FastEthernet3

!

interface Vlan1

description $ETH-SW-LAUNCH$$INTF-INFO-HWIC 4ESW$$ES_LAN$$FW_INSIDE$

ip address 10.10.10.1 255.255.255.0

ip access-group 100 in

ip nat inside

no ip virtual-reassembly

!

interface Dialer0

no ip address

!

ip classless

!

ip http server

ip http authentication local

ip http secure-server

ip http timeout-policy idle 60 life 86400 requests 10000

ip nat inside source list 1 interface ATM0.1 overload

ip nat inside source static tcp 10.10.10.1 22 interface Dialer0 822

ip dns server

!

logging trap debugging

access-list 1 remark INSIDE_IF=Vlan1

access-list 1 remark SDM_ACL Category=2

access-list 1 permit 10.10.10.0 0.0.0.255

access-list 100 remark CCP_ACL Category=17

access-list 100 deny   ip host 255.255.255.255 any

access-list 100 deny   ip 127.0.0.0 0.255.255.255 any

access-list 100 permit ip any any

access-list 101 permit tcp any any established

access-list 101 permit udp host 212.68.213.7 eq ntp any eq ntp

access-list 101 permit udp host 81.246.92.140 eq ntp any eq ntp

access-list 101 permit udp host 208.67.220.220 eq domain any

access-list 101 permit udp host 208.67.222.222 eq domain any

access-list 101 permit tcp any any eq 822

access-list 101 permit icmp any any administratively-prohibited

access-list 101 permit icmp any any echo

access-list 101 permit icmp any any echo-reply

access-list 101 permit icmp any any time-exceeded

access-list 101 permit icmp any any traceroute

access-list 101 permit icmp any any unreachable

access-list 101 permit udp any eq bootps any eq bootpc

access-list 101 deny   ip any any

snmp-server community privateString RW

snmp-server community publiekeString RO

snmp-server location Hasselt

snmp-server contact GregoryBE

!

control-plane

!

banner login Authorized access only!

Gretech Configured router. Unauthorized access will be logged.

!

line con 0

login local

no modem enable

transport output telnet

line aux 0

login local

transport output telnet

line vty 0 4

privilege level 15

login local

transport input telnet ssh

!

scheduler max-task-time 5000

scheduler allocate 4000 1000

scheduler interval 500

ntp clock-period 17179862

ntp master

ntp server 81.246.92.140 prefer

ntp server 212.68.213.7

end
Links:
http://www.cisco.com/en/US/tech/tk175/tk15/technologies_configuration_example09186a008071a5d0.shtml
http://forums.overclockers.com.au/showthread.php?t=460519
Updating ESX 3.5 to 4.0: PANIC: Failed to find HD boot partition
In September I successfully updated a ESXi 3.5 host to ESXi 4.0.
A week ago I needed to upgrade another server,
so I thought no need backing up de VM's this time before doing the upgrade.
Of course, with no backup the upgrade failed, the ESXi server rebooted after performing the upgrade with vSphere and came up with the following message:
PANIC: Failed to find HD boot partition.
Before trying the repair wizard on the ESXi 3.5 CD, I backup-ed all VM's to another machine over the network using an Ubuntu Live CD, how to mount the VMFS store:
- In the software sources, enable the Universe library and reload the packages
- Open a terminal: su
- apt-get install vmfs-tools
- mkdir /vmdir/
- vmfs-fuse /vmdir/ /dev/sda3 (look up your sda, in gparted f.e.)
Also useful to know to fasten the backup:
- Mounting a Samba share to a dir:
apt-get install smbfs
sudo mount -t smbfs -o username=usernamePC,password=ShareAccessPassword,workgroup=MSHOME,gid=smb,uid=$USER,fmask=770,dmask=770,rw "//DEVMACHINE/Share with Spaces" /createdDir
So, after creating a backup, I tried the ESX 3.5 repair wizard, wich is useless, it re-installs ESX and leaves the VMFS store unallocated.
I then just installed ESXi 4 (that formats the full disk)
Second problem: I started VSphere update client, when scanning for updates I get:
The scan operation has failed... Check the logs.
The problem wasn't very known on the internet, so I just reinstalled a second time. Surprisingly the problem disappeared and updates where installed correctly.
Then I just installed VMware converter on the backup PC to re-import the VM's to the ESXi server in the new VMware 7 format.
Linksys/3Com ADSL modem speed test
Just a little test I performed: Two different ADSL modems on the same ADSL2+ Line, same cable, same connectors...
3COM: OfficeConnect ADSL Wireless 108 Mbps 11g Firewall Router
Linksys: WAG200G
(Did the test serveral time to make sure the results are correct.) I should have taken note of the noise and margin values, will do that in future tests...
Everything to know about Wire sharking
Everything to know about Wire sharking, and how to defend yourself against it.
Also a very strange subject, how to detect Packet sniffers on your network: 2.5
Flashing DDWRT (on WRT54GL)
Recently I was talking with a friend (Jones) about DD-WRT and Tomato, he told me that an hard reset is always required before and after flashing a firmware, something I didn't know. I always just flashed the firmware...
So basically how to flash a WRT54GL with the original Linksys firmware on it (using GUI):
- Download Micro or Mini to start with,
If you want to install another DDWRT version, afterwards also download it (STANDARD, VOIP, or VPN versions)
DDWRT Firmwares - Hard reset (original Linksys firmware)
- Upgrade to Micro or Mini
- The Waiting...
- Hard reset
- Upgrade to the STANDARD, VOIP, or VPN versions.
- The Waiting...
- Hard reset
What is a Hard reset (30/30/30 reset):
- Hold down the reset button for 30 seconds (with the router powered on)
- Still holding it, pull the power cord for 30 seconds.
- Still holding it, plug the router back in and continue to hold the reset button for 30 more seconds.
(When the hard reset is performed correctly, you will be asked to change your password when you login to the webgui)
The Waiting:
After you flash the firmware, and before you do the hard reset, the router will be building some nvram settings. YOU MUST WAIT FOR THIS TO FINISH PRIOR TO DOING ANYTHING WITH THE ROUTER INCLUDING A HARD RESET. Usually, you can tell when this process is completed by the WAN light coming on, but it does take several minutes. Go have a beer. There are starting to be more and more people who BRICK their routers by not waiting until the nvram is rebuilt, PRIOR to doing a hard reset. YOU NEED TO WAIT!
The reason for the hard resets:
You want to flash to a "clear" nvram. This helps to prevent problems. That is the reason the chip is being cleared prior to flashing. Old values can corrupt things. So can failing to power cycle. Without doing a hard reset it is possible that your WRT54GL will get slow.
Links:
Linksys WRT54GL
Peacock Thread-FAQ: EVERYTHING you NEED to know! Really!! (very handy)
Flashing Your Router with DD-WRT Firmware
Hello world!
Hello,
My first blog, in the future I'm going to try to post some useful posts and links that were helpful for me.
If you are reading this, post some comment or tips!
